A watermark is any recognizable text, logo or pattern that appears over an image to identify the owner of the image and generally used to prevent unauthorized reuse of the image. Watermarks are usually transparent and can be difficult to remove. The difficulty or ease of removal depends on the content of the image and the position, color, size etc of the watermark.
There are several resources out there that teaches you how to remove watermark from pictures, but most of them are old. Although these guides are still relevant, in light of some new tools that has recently become available in our hands, I decided a new guide was necessary. Hence this tutorial.
Removing water mark using Photoshop CS5
The new iteration of Photoshop, Creative Suite 5 or CS5 in short, includes some handy tools that really helps in such tasks as removing watermarks. You must have already heard because we wrote about this tool on Instant Fundas. It’s called Content Aware Fill.
For our example we will use an image from iStockPhoto and try to remove the watermark right across the face of the image.
Disclaimer: The use of materials from iStockphoto is for illustrative purposes only. We do not encourage stealing of copyrighted images from iStockphoto or from any other sources.

Open the image in Photoshop CS5, and select the “Spot Healing Brush Tool” from the toolbar. You can also press J to select it.

Select the option Content Aware Fill on the toolbar at the top.

Press [ or ] to increase or decrease the size of the brush as required, and carefully paint it over the watermark.

Release it, and the line is gone.

If the result is unsatisfactory, undo it or go back in History and repeat. Use the smallest brush size as possible to get good results.
For larger areas we will use the lasso tool. Select the watermark to remove using the Lasso Tool (L). Notice that I selected only a part of the watermark. This is because the image behind the watermark is not uniform. To get the best results work with small areas of the watermark. In this example, I left out the horn of the skull since it has a different texture.

Now press D. Make sure “Content Aware” is selected under “Use” and press OK.

Remember, you can always undo and repeat the steps. Here is the final result with the complete watermark removed. Not perfect but passable.

Removing water mark using GIMP
GIMP too has a Content Aware Fill type feature which can be added to the software using plug-ins.
Download the Resynthesizer plugin and copy the executable called resynthesizer.exe to gimp-2.0\lib\gimp\plug-ins\ directory.
Download this script (from Newslily) and copy it to
gimp-2.0\share\gimp\scripts\
gimp-2.0\share\gimp\scripts\
Restart GIMP to reload the scripts.
Open the image on GIMP and using the lasso tool to select the watermark. Again notice that I’m doing this by selecting smaller chunks of area and not the entire logo.

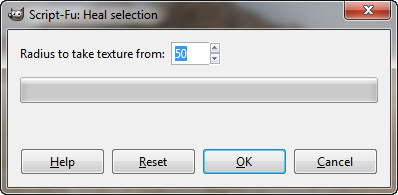
Now click on Filters>Enhance>Heal Selection.

Specify the radius to take the selection from. The default is 50 and should work fine. If it doesn’t, play around with the radius until you get the desired result. Once the heal is applied, the watermark should be gone.

Carry on with the rest of the image carefully selecting the areas to remove. This is the final result. Not bad, right?

So which is better: GIMP or Photoshop?
Neither is perfect and both performs similarly. Sometimes GIMP gives better control as you have the option to specify the cloning radius. On the other hand, Photoshop gives you the option of different modes – Multiply, darken, etc. The Spot Healing Brush tool is also easier to operate on tiny areas than the lasso tool.
Use which ever you are comfortable working with.
Comments
Post a Comment